Our reviews are based on aggregated verified buyer feedback, manufacturer specifications, and published expert opinion. Products are not independently tested by our team.
Diamond painting has quietly become one of the most popular crafting hobbies in the world, and for good reason. It combines the satisfaction of creating sparkling, mosaic-like artwork with the calming, repetitive motions that make crafting so therapeutic. If you’ve seen those dazzling finished pieces on social media and wondered whether you could make one yourself, the answer is absolutely yes. Diamond painting for beginners is genuinely accessible, requiring no artistic talent whatsoever.
This guide walks you through everything you need to know to start your first diamond painting project. From understanding the difference between round and square drills to setting up your workspace and placing your first gems, you’ll have complete confidence by the time you pick up that applicator pen.
What Is Diamond Painting?
Diamond painting is a craft that involves placing tiny resin “drills” (small faceted gems) onto a color-coded adhesive canvas to create a sparkling piece of art. Think of it as a cross between paint by numbers and cross-stitch, but instead of paint or thread, you’re working with thousands of small, shimmering rhinestones.
The concept originated in Asia and gained worldwide popularity in the mid-2010s. Each canvas comes printed with a coded pattern, where every symbol corresponds to a specific drill color. You simply match the colored drills to their corresponding symbols and press them onto the sticky canvas surface. The result is a textured, glittering artwork that catches the light beautifully.

What makes diamond painting so appealing is that it requires zero artistic skill. The design is already created for you. Your job is simply placement, which means anyone can produce a stunning finished piece regardless of drawing or painting ability. Many crafters describe the process as deeply meditative, comparing it to activities like adult coloring books but with a more impressive final result.
How Diamond Painting Works
Every diamond painting kit includes a few standard components. Understanding each one before you begin makes the whole process smoother and more enjoyable.
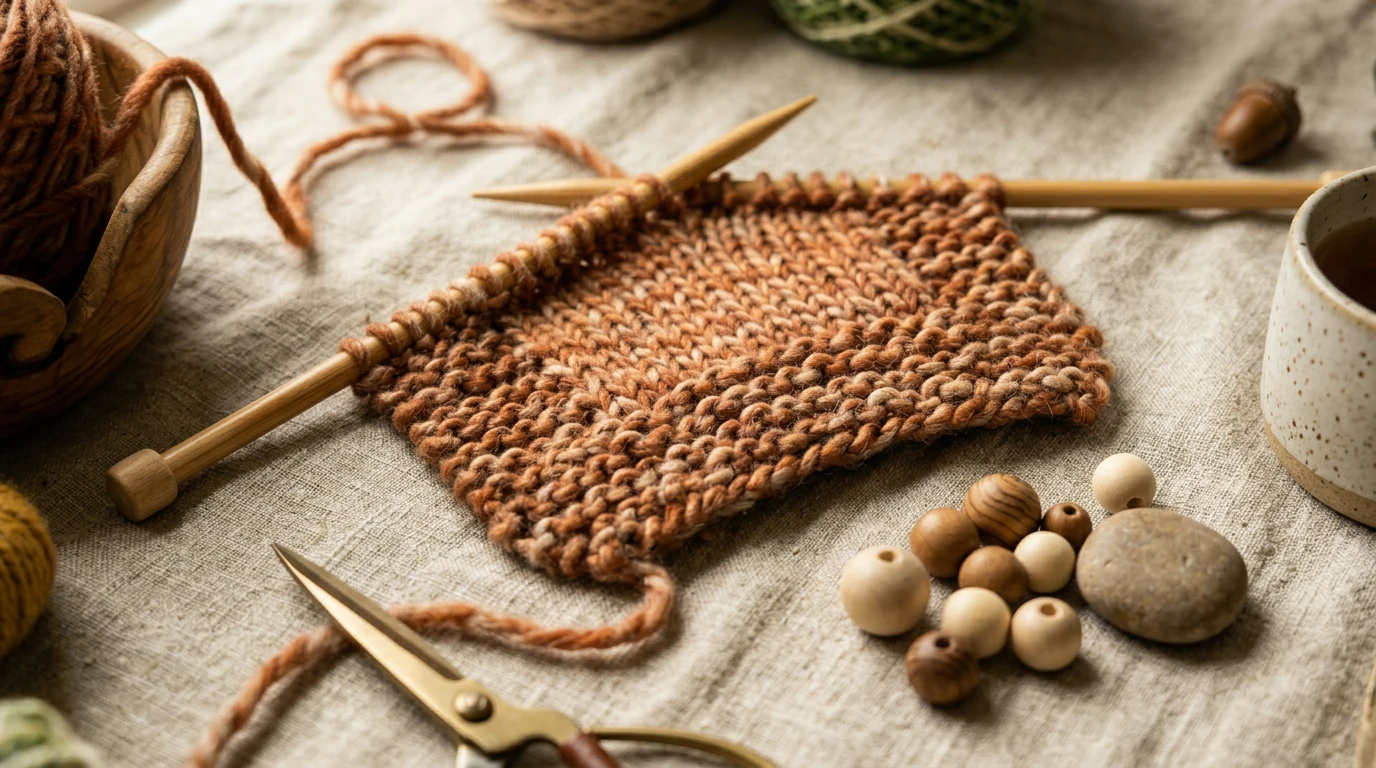
The canvas is a fabric sheet printed with the design. One side shows the color-coded chart with tiny symbols, and this side is coated with a layer of adhesive covered by a protective plastic film. You peel back the film in small sections as you work, exposing the sticky surface where drills will adhere.
The drills are the tiny resin gems that create the sparkle. They come pre-sorted in small bags, each labeled with a DMC color code that matches the symbols on your canvas. Higher-quality kits use AB drills (Aurora Borealis) for certain colors, which have an extra iridescent coating for even more shimmer.
The applicator pen is a hollow stylus used to pick up individual drills. You dip the tip into a small container of wax or gel, which creates enough tack to pick up a drill and place it precisely on the canvas. Most kits include a basic pen, though many experienced crafters upgrade to ergonomic or multi-placer versions.
The tray is a grooved plastic dish where you pour out your drills. The ridges help drills settle face-up, making them easier to pick up with the applicator pen. You’ll work with one color at a time, pouring a small amount into the tray and placing those drills before switching to the next color.
The wax pad is a small square of tacky material. Press the tip of your applicator pen into the wax, and it picks up just enough stickiness to grab a single drill. One pad typically lasts several projects.
Understanding Drill Types: Round vs Square
This is the first decision you’ll face when choosing a kit, and it matters more than you might expect. Diamond painting drills come in two shapes, and each produces a distinctly different look and crafting experience.
Round drills are circular gems with a domed, faceted top. They’re the most beginner-friendly option because they don’t need to be placed in a specific orientation. You simply press them onto the canvas, and they sit properly no matter how they land. Round drill paintings have a softer appearance with tiny gaps between each drill, giving the finished piece a textured, almost pointillist look.
Square drills are flat-topped gems that fit together like tiny tiles with no gaps between them. This creates a more complete, mosaic-like coverage that many crafters prefer for the finished look. However, square drills require more precise placement since they need to sit straight and flush against their neighbors. Crooked square drills are more noticeable than misaligned round ones.
For your first project, round drills are the better choice. They’re more forgiving of imprecise placement, faster to work with, and still produce a beautiful result. Once you’re comfortable with the basic technique, you can move to square drills for that satisfying full-coverage finish. You can read our detailed round vs square drills comparison for a deeper breakdown.
Essential Tools and Supplies
A standard diamond painting kit includes everything you need to get started: the printed canvas, pre-sorted drills, an applicator pen, a wax pad, and a tray. However, a few additional tools can significantly improve your experience.
- Light pad: A thin LED panel that sits under your canvas, illuminating the symbols from below. This is especially helpful for detailed designs with small symbols or for crafting in the evening. Many crafters consider this the single best upgrade. Check our light pad buying guide for recommendations.
- Multi-placer tips: Applicator pen tips that pick up 3, 5, or even 9 drills simultaneously. These speed up large single-color areas dramatically.
- Storage containers: Small compartmented boxes or bags for organizing leftover drills by DMC color code. You’ll accumulate extras over time, and they’re useful for filling gaps in future projects.
- Tweezers: Fine-tipped tweezers help adjust or remove misplaced drills without disturbing neighbors.
- Roller: A small hand roller or brayer used to press drills firmly into the adhesive after completing a section, ensuring a secure bond.
You don’t need any of these extras for your first project. The included tools are sufficient. But once you discover how relaxing diamond painting is, you’ll likely want to invest in a light pad and better storage within your first few projects.
Setting Up Your Workspace
Your workspace setup directly affects how comfortable and enjoyable your diamond painting sessions will be. Since projects often take 10 to 40 hours depending on size, investing a few minutes in a good setup pays off enormously.
Choose a flat, clean surface where your canvas can sit undisturbed between sessions. A dining table, desk, or dedicated craft table all work well. If you share the space, consider a portable board that you can carry to another location without disturbing your work in progress.
Lighting is critical. You need to see the tiny symbols clearly, and dim lighting leads to eye strain and placement errors. Position your workspace near a window for natural light during the day, and use a bright desk lamp or light pad for evening sessions. Daylight-spectrum LED bulbs reduce eye fatigue compared to warm yellow bulbs.
Keep your drills organized before you begin. Lay out the labeled bags and identify which colors correspond to which symbols on your canvas legend. Some crafters immediately transfer all drills into labeled compartment boxes, while others work directly from the bags. Either approach works, but labeled storage becomes essential as your collection grows.
Finally, protect your canvas. The adhesive surface is surprisingly resilient, but pet hair, dust, and crumbs will stick to exposed areas. Keep the protective plastic film in place on any section you’re not actively working on, and cover your work between sessions with a clean cloth or the original packaging.
Step-by-Step Diamond Painting Process
Here’s the complete process for creating your first diamond painting, from opening the kit to placing your final drill.
Step 1: Unroll and flatten your canvas. Most canvases arrive rolled in a tube. Unroll it and place it flat on your workspace. If it curls at the edges, place heavy books on the corners for a few hours. Some crafters put the canvas under a mattress overnight to achieve perfect flatness. Never iron a diamond painting canvas, as heat can damage the adhesive layer.
Step 2: Read the legend. Your canvas has a printed legend (usually along the border) showing which symbol corresponds to which drill color and DMC code. Take a moment to familiarize yourself with the most common symbols in your design. You’ll quickly memorize the most-used ones.
Step 3: Choose a starting area. Most experienced crafters recommend starting from the bottom of the canvas and working upward. This prevents your arm from resting on completed sections, which could dislodge drills. Start at the bottom corner of your dominant hand side. Alternatively, some people prefer working from the center outward for large canvases.
Step 4: Peel back a small section of film. Only expose about 2 to 4 inches of adhesive at a time. Exposing too much at once allows dust to settle on the sticky surface and reduces its grip. Cut the film rather than peeling it completely so you can re-cover sections if needed.
Step 5: Pour drills into the tray. Choose one color that appears frequently in your exposed section. Pour a small amount of that color into the grooved tray. Gently shake the tray side to side, and most drills will flip face-up in the grooves, ready for pickup.
Step 6: Apply wax and place drills. Press the tip of your applicator pen into the wax pad. Then touch the tip to the flat top of a drill in the tray. It should stick to the pen with a gentle press. Bring the pen to the corresponding symbol on the canvas and press the drill down. It should adhere immediately to the sticky surface.
Step 7: Complete one color at a time. Place all drills of one color in your exposed section before switching to the next color. This is faster than switching colors for every individual drill. When you’ve finished all instances of one color, pour the extras back into their bag, clean the tray, and move to the next color.
Step 8: Expose the next section and repeat. Once your current section is complete, peel back more film and continue. Periodically press completed sections gently with a roller or the flat of your hand to ensure drills are securely seated.
Tips for Faster and Neater Work
As you gain experience, you’ll develop your own rhythm. These tips from experienced crafters can help you work more efficiently from the start.
Work in rows for square drills. Place drills in a straight line rather than randomly filling in symbols. This keeps your rows aligned and prevents the “crooked column” effect that makes square drill paintings look uneven.
Re-wax frequently. When your applicator pen stops picking up drills reliably, press it into the wax pad again. A fresh wax application solves most pickup problems. If the included wax dries out, a small piece of Blu-Tack or museum putty works as an excellent replacement.
Don’t over-press drills. A gentle press is sufficient. Pushing too hard can actually push drills below the adhesive surface, creating an uneven texture. Let the adhesive do its job.
Use the checkerboard technique for large areas. When filling a large section of one color, place drills in every other space (like a checkerboard) first, then fill in the gaps. This keeps your rows straight because each drill has a neighbor guiding its position.
Take breaks to protect your posture. Diamond painting is engrossing, and it’s easy to hunch over your work for hours. Set a timer to remind yourself to stretch your neck, shoulders, and hands every 30 to 45 minutes. Your body will thank you during longer projects.
For more advanced efficiency techniques, our diamond painting tips and tricks guide covers multi-placer tools, wax alternatives, and section strategies in detail.
What to Do When You Finish
Completing a diamond painting is deeply satisfying. That moment when you place the final drill and step back to see the full sparkling image is what keeps crafters coming back to this hobby. But the project isn’t quite done yet.
First, inspect your finished canvas for any missing or misaligned drills. Check the edges carefully, as these are the most common spots for gaps. Use tweezers to straighten any crooked drills and fill any empty spaces with leftover drills from your bags.
Next, press the entire canvas firmly. Place a sheet of parchment paper over the surface and roll a brayer or rolling pin across it with firm, even pressure. This pushes all drills securely into the adhesive for a permanent bond.
Many crafters choose to seal their finished diamond paintings with a clear sealant like Mod Podge or a spray-on fixative. This locks drills in place permanently and prevents them from popping off over time. It’s an optional step, but recommended for pieces you plan to display or gift.
Finally, consider your display options. Diamond paintings look stunning when framed and hung on a wall. You can use stretcher bars to mount the canvas like traditional artwork, purchase a ready-made frame, or use adhesive mounting methods. Our framing and display guide covers all your options.
Common Beginner Mistakes to Avoid
Learning from others’ mistakes saves you time and frustration. Here are the most common beginner errors and how to avoid them.
Peeling off all the film at once. This is the number one beginner mistake. The exposed adhesive collects dust, pet hair, and debris that reduces its stickiness. Only peel small sections as you work. If the adhesive loses its grip, a light application of craft glue can rescue the area.
Confusing similar symbols. Some canvases use symbols that look very similar, especially in low light. The letter “O” and number “0,” or a square and a diamond, can be easily mixed up. Use a light pad and magnifying glass if needed, and always double-check against the legend.
Placing the wrong color. This happens more often than you’d expect, especially with colors that look similar in artificial light. Check drill colors in natural daylight when possible. If you discover a wrong color after placing several drills, use tweezers to carefully pry them off and replace them.
Starting with a massive canvas. Your first diamond painting should be relatively small, around 30x30cm or 12×12 inches. Large canvases (40x50cm and above) can take 20 to 40 hours to complete, which may feel overwhelming before you’ve developed the habit. Start small, build your confidence, and gradually increase canvas size.
Buying the cheapest kit available. Not all diamond painting kits are equal. Very cheap kits often have poorly printed canvases with hard-to-read symbols, weak adhesive, and drills with inconsistent color matching. Reputable brands like Diamond Art Club, Diamond Dotz, and Heartful Diamonds consistently receive positive buyer reviews for canvas and drill quality.

Growing Your Diamond Painting Skills
Once you’ve completed your first project, you’ll have a solid foundation to explore the wider world of diamond painting. Here’s how many crafters progress in this hobby.
Try square drills. If your first project used round drills, try a square drill kit next. The full-coverage finish and satisfying “snap” of tiles fitting together is a different but equally rewarding experience.
Increase canvas size gradually. Move from small (30x30cm) to medium (40x50cm) to large (50x70cm or bigger). Larger canvases produce more detailed, impressive images but require more patience and time.
Explore custom designs. Several services allow you to upload your own photos and receive a custom diamond painting kit. Family portraits, pet photos, and vacation landscapes all translate well. Our guide to custom diamond painting kits reviews the top services.
Join a community. Diamond painting communities on Facebook, Reddit (r/diamondpainting), and Instagram are welcoming spaces where crafters share tips, progress photos, and recommendations. The community aspect adds another layer of enjoyment to the hobby.
Invest in your tools. As diamond painting becomes a regular part of your routine, upgrading to ergonomic pens, high-quality light pads, and proper drill storage makes every session more comfortable. See our complete accessories and tools guide for the best upgrades.
Diamond painting is one of those rare hobbies that’s genuinely easy to start and endlessly enjoyable to continue. There’s something magical about watching a sparkly image emerge from thousands of tiny gems, and according to the Harvard Health Blog, the repetitive, focused nature of crafts like this can reduce stress and improve mental well-being. Your first finished piece will likely be the start of a beautiful new hobby.
Frequently Asked Questions
Do I need any artistic talent or experience to do diamond painting?
No, diamond painting for beginners requires absolutely no artistic skill or experience. The design is already created for you on the canvas, and you simply match colored drills to their corresponding symbols and press them onto the sticky surface.
What’s the difference between round and square diamond drills?
Round drills are circular gems that are easier to pick up and place, making them ideal for beginners, while square drills fit together more tightly and create a more polished, seamless finished appearance. The choice between them is mostly about personal preference and the look you want for your final piece.
How long does it typically take to complete a diamond painting project?
The time varies depending on the canvas size and your pace, but most projects take anywhere from a few hours to several weeks of casual crafting. The repetitive, calming nature of the work means many people enjoy spreading it out over time rather than rushing to finish.
Is diamond painting similar to other crafts like cross-stitch or paint by numbers?
Yes, diamond painting combines elements of both crafts. Like paint by numbers, the design is already created with a coded pattern, and like cross-stitch, you work with small repetitive motions to build the complete image. However, instead of paint or thread, you’re placing tiny sparkling resin gems onto an adhesive canvas.