Dried flower arranging has captured the hearts of crafters everywhere, offering a beautiful way to preserve nature’s beauty long after fresh blooms have faded. Whether you’re looking to create lasting displays from your garden harvest or want arrangements that don’t require daily care, mastering dried flower arranging techniques opens up a world of creative possibilities that can fill your home with natural beauty for months to come.
Our reviews are based on aggregated verified buyer feedback, manufacturer specifications, and published expert opinion. Products are not independently tested by our team.
Why Dried Flowers Are Trending
The resurgence of dried flower arranging reflects our growing desire for sustainable, low-maintenance home décor. Unlike fresh arrangements that require constant water changes and careful temperature control, dried flower displays can maintain their beauty for months or even years with minimal care.
For many women entering their golden years, dried flower arranging offers the perfect balance of creative expression and practicality. You can work at your own pace, creating arrangements when inspiration strikes without worrying about flowers wilting before you finish. This hobby also allows you to preserve meaningful blooms from special occasions, garden milestones, or seasonal favorites.
The cost-effectiveness of dried arrangements particularly appeals to budget-conscious crafters. Once you’ve invested in quality dried materials, your arrangements can last indefinitely. Many enthusiasts find they can create stunning displays using flowers from their own gardens, making this an especially rewarding hobby for those who enjoy both gardening and crafting.
According to the USDA’s organic farming statistics, more Americans are growing their own flowers organically, making dried flower arranging a natural extension of the home gardening movement. This trend aligns perfectly with the desire for chemical-free, sustainable home décor options.
Best Flowers for Drying
Success in dried flower arranging begins with selecting the right varieties. Some flowers naturally retain their color and structure better than others when dried, making them ideal candidates for long-lasting arrangements.
Excellent Choices for Beginners
Statice stands out as one of the most reliable flowers for drying, maintaining its papery texture and vibrant colors beautifully. Baby’s breath creates delicate, airy textures that work wonderfully as filler material. Lavender not only dries excellently but also adds a lovely fragrance to arrangements that can last for months.
Globe amaranth retains its round, colorful blooms almost perfectly when dried, while strawflowers seem designed specifically for dried arrangements with their naturally papery petals. Celosia varieties, particularly the feathery cockscomb types, add dramatic texture and hold their colors remarkably well.
Flowers That Require Special Care
Roses can be dried successfully, but they require careful timing and technique. Pick them just before full bloom for best results. Peonies create stunning dried flowers but must be harvested at exactly the right stage and dried quickly to prevent browning.
Hydrangeas offer magnificent volume in dried arrangements, but timing is crucial. Harvest them in late summer when the petals feel papery to the touch. Delphinium spikes dry beautifully but need immediate attention after cutting to prevent wilting.
- Harvest flowers in mid-morning after dew has evaporated
- Choose blooms that are just beginning to open rather than fully mature
- Cut stems longer than needed since they’ll shrink during drying
- Process flowers immediately after cutting for best results
Air Drying Method
Air drying remains the most popular and accessible method for preserving flowers. This traditional technique requires no special equipment beyond rubber bands, string, and a suitable drying location. The key to successful air drying lies in creating the right environment and following proper preparation techniques.
Setting Up Your Drying Space
Choose a dark, dry area with good air circulation for your drying space. Attics, spare rooms, or large closets often work perfectly. Avoid areas with high humidity, direct sunlight, or temperature fluctuations, as these conditions can cause flowers to fade, become moldy, or dry unevenly.
Install hooks or nails in the ceiling or create a simple drying rack using wooden dowels stretched between supports. Ensure you have enough space to hang bundles without them touching each other, as crowded flowers are more prone to mold and uneven drying.
Proper Bundling Technique
Remove all foliage from the lower portions of stems, as leaves can trap moisture and cause decay. Group flowers into small bundles of 5-10 stems, depending on the flower size. Larger bundles dry too slowly and risk developing mold in the center.
Secure bundles with rubber bands rather than string, as stems shrink during drying and string may become too loose. Place rubber bands about an inch from the stem ends, ensuring they’re tight enough to hold securely but not so tight that they damage the stems.
Hang bundles upside down to maintain straight stems and prevent flowers from drooping. Space bundles at least six inches apart to ensure adequate air circulation. Most flowers complete the air drying process within two to three weeks, though timing varies depending on flower type, humidity levels, and air circulation.

- FLORAL ARRANGEMENT KIT: 1 x wire cutter, 1 x scissor, 4 x color floral tape 120
- FLORAL GARDEN WIRE CUTTER: The floral wire cutter is made of super quality solid
- FLORAL WIRE: Floral stem and paddle wires are made of metal wire with paper wrap
Silica Gel Drying Method
Silica gel drying offers superior color retention and faster processing times compared to air drying. This method works particularly well for delicate flowers that might lose their shape or color with traditional air drying techniques.
Understanding Silica Gel
Silica gel consists of small, porous beads that absorb moisture rapidly and efficiently. You can purchase floral-grade silica gel from craft stores, or reuse the type that comes in electronic packaging after heating it in a low oven to reactivate its moisture-absorbing properties.
The beauty of silica gel lies in its reusability. After each drying session, spread the gel on a baking sheet and heat it at 200°F for about an hour to remove absorbed moisture. Store reactivated gel in airtight containers until your next project.
Step-by-Step Silica Gel Process
Start with an airtight container large enough to hold your flowers without crowding. Pour a layer of silica gel about an inch deep in the bottom. Trim flower stems to about one inch, as longer stems are unnecessary and can complicate the process.
Place flowers face-up on the gel bed, ensuring they don’t touch each other. For multi-petaled flowers like roses, gently separate petals slightly to allow gel to reach all surfaces. Carefully pour more silica gel around and over the flowers, using a small spoon to work gel between petals without damaging delicate structures. For more guidance, Garden Design provides expert resources on floral arrangements.
Cover flowers completely with gel, then seal the container tightly. Most flowers dry within 24-72 hours using this method. Check progress carefully, as over-drying can make petals brittle and prone to breaking.
- Label containers with flower types and drying dates
- Use separate containers for different flower varieties
- Handle dried flowers gently when removing them from gel
- Brush away excess gel with a soft paintbrush
Pressing Flowers for Flat Displays
Flower pressing creates beautifully flat specimens perfect for framed displays, cards, or craft projects. This gentle preservation method works especially well for flowers with naturally flat profiles or those you want to showcase in botanical-style arrangements.
Traditional Press Method
Wooden flower presses provide the most consistent results for serious pressing enthusiasts. These tools use adjustable screws to apply even pressure across multiple layers of flowers and absorbent paper. You can also create effective presses using heavy books, though this method requires more careful monitoring.
Layer flowers between sheets of absorbent paper, such as blotting paper or specialized pressing papers available at craft stores. Avoid tissues or paper towels, as their texture can imprint on delicate petals. Change the papers after the first few days to remove excess moisture and prevent mold.
Quick Microwave Pressing
For faster results, microwave pressing offers an alternative that produces pressed flowers in minutes rather than weeks. This method requires ceramic tiles and absorbent paper. Place flowers between paper sheets, then sandwich the assembly between tiles.
Microwave in 30-second intervals on medium power, checking frequently to prevent over-heating. This method works best for relatively flat flowers and small batches. While faster than traditional pressing, microwave pressing may not achieve the same color retention as slower methods.
Arranging Dried Flowers: Tips and Techniques
Creating beautiful dried flower arrangements requires understanding how dried materials behave differently from fresh flowers. Dried stems are more brittle, colors may be more muted, and the overall texture creates different visual weight in arrangements.
Design Principles for Dried Arrangements
Start with a focal point using your largest or most dramatic flowers. Dried peonies, large roses, or full hydrangea heads work excellently as focal elements. Build around these anchor points using medium-sized flowers and finish with delicate filler materials.
Consider height variations more carefully than with fresh arrangements, as dried flowers can’t be easily repositioned once placed. Plan your arrangement mentally or sketch it out before beginning. Use the rule of odds, grouping flowers in clusters of three, five, or seven for the most pleasing visual impact.
Texture plays a crucial role in dried arrangements. Combine smooth, rounded flowers like globe amaranth with feathery materials like celosia or grass-like elements such as dried wheat or oats. This variety prevents arrangements from appearing flat or monotonous.
Working with Fragile Materials
Handle dried flowers gently, as they break more easily than fresh materials. When inserting stems into foam or other mechanics, use a toothpick or skewer to pre-make holes. This prevents stems from snapping under pressure.
For very delicate flowers, consider wiring techniques used by professional florists. Use 22-gauge florist wire for heavier stems and 26-gauge for lighter materials. Insert wire through the flower head and down into the natural stem, then wrap with clear floral tape for a natural appearance.
Buyers report that Fiskars floral shears provide clean cuts on dried stems without crushing delicate structures. The precision cutting action helps preserve the integrity of brittle dried materials better than regular scissors or pruners.
Creating Movement and Flow
Despite their static nature, dried flower arrangements should suggest movement and natural growth patterns. Vary stem heights significantly, allowing some elements to extend well above others. Create gentle curves by carefully bending pliable stems or adding curved branches or vines.
Use trailing elements like dried ivy, eucalyptus, or preserves ferns to create downward movement that softens container edges. These cascading elements help connect the arrangement to its surroundings and create a more natural, less rigid appearance.
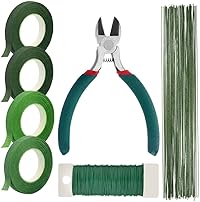
- FLORAL ARRANGEMENT TOOLS INCLUDED – 100 pieces green stem wire 26 gauge, 114 fee
- 26 GAUGE FLORAL WIRE – Come with 100 pieces and with length of 14 inches, covere
- 22 GAUGE PADDLE WIRE – Offers 114 feet, flexible green wire for crafts and proje
Best Containers for Dried Arrangements
Container choice significantly impacts both the longevity and visual appeal of dried flower arrangements. Unlike fresh arrangements that require water-holding capabilities, dried flower containers focus primarily on aesthetic and structural considerations.
Traditional Vase Options
Syndicate Sales vases offer excellent proportions for dried arrangements, with their wide mouths accommodating voluminous dried materials while providing stable bases. Ceramic and pottery vessels work particularly well, as their weight provides stability for top-heavy dried arrangements.
Glass containers showcase dried stems beautifully but require attention to arrangement mechanics. Since you can’t hide unsightly foam or wires as easily in clear containers, plan your structural elements carefully. Consider filling the bottom with decorative stones, dried beans, or colored sand to hide mechanics while adding visual interest.
Creative Container Ideas
Vintage teapots, wooden boxes, and wicker baskets offer charming alternatives to traditional vases for dried arrangements. These containers work particularly well for rustic or cottage-style displays. Line non-waterproof containers with plastic to protect surfaces from any residual moisture in newly dried materials.
Galvanized metal containers create appealing industrial or farmhouse aesthetics. Their wide openings accommodate large, spreading arrangements, while their substantial weight provides excellent stability. Consider aging new galvanized pieces with salt water to achieve authentic patina.
Arrangement Mechanics
Oasis floral foam designed specifically for dried arrangements provides excellent stem support without requiring water saturation. This brown foam is denser than fresh flower foam and holds stems securely even when they shrink slightly over time.
Kenzan pin frogs work excellently for dried arrangements, especially in shallow bowls or wide containers. These Japanese flower frogs hold stems firmly and can be reused indefinitely. Their metal pins easily accommodate varying stem thicknesses and can be bent slightly to achieve desired angles.
| Container Type | Best For | Considerations |
|---|---|---|
| Ceramic Vases | Traditional arrangements | Heavy, stable, wide variety of styles |
| Glass Containers | Showcasing stems | Requires neat mechanics, shows everything |
| Baskets | Casual, country styles | May need liner, natural textures |
| Metal Vessels | Industrial, modern looks | Can rust, may need protective coating |
Caring for Dried Flower Displays
Proper care extends the life of dried flower arrangements significantly, keeping them looking fresh and vibrant for months or even years. Understanding how to maintain these displays ensures your investment in time and materials provides long-lasting beauty.
Environmental Considerations
Keep dried arrangements away from direct sunlight, which causes rapid fading and makes already-brittle materials even more fragile. North-facing windows provide gentle, indirect light that showcases arrangements without damaging them. Artificial lighting, particularly LED lights, won’t generate heat that could further dry out materials.
Maintain consistent humidity levels around your displays. Extremely dry conditions make flowers more brittle, while high humidity can cause mold or cause dried materials to reabsorb moisture and droop. Most homes maintain appropriate humidity levels naturally, but consider the environment if you notice changes in your arrangements.
Cleaning and Maintenance
Dust accumulation dulls the appearance of dried arrangements over time. Use a soft paintbrush, makeup brush, or clean feather duster to gently remove dust from flower surfaces. Work carefully to avoid breaking delicate petals or dislodging loosely attached elements.
For more thorough cleaning, use a hair dryer on the coolest setting to blow dust from hard-to-reach areas. Hold the dryer at least 12 inches away and use gentle air flow to avoid damaging arrangements. Some crafters report success using compressed air designed for cleaning electronics, but test this method on a small area first.
Refreshing Arrangements
Over time, you may need to replace individual elements that have become too fragile or faded. Keep extra dried materials stored in boxes with tissue paper for these touch-ups. When replacing elements, choose materials that have aged similarly to maintain color consistency throughout the arrangement.
Consider seasonal refreshing by adding new elements that complement the changing seasons. Small pinecones, berries, or seasonal foliage can update existing arrangements without requiring complete reconstruction.
Storage Between Seasons
If you rotate seasonal displays, store dried arrangements in boxes lined with tissue paper. Layer materials carefully and include moisture-absorbing packets to prevent any humidity damage during storage. Label boxes clearly with contents and dates to help you locate specific pieces easily.
Wrap particularly delicate elements individually in tissue paper before boxing. Store boxes in cool, dry locations away from temperature extremes. Basements may be too humid, while attics might experience temperature fluctuations that could damage stored materials.
Recognizing When to Replace
Even well-cared-for dried arrangements eventually need replacement or significant refreshing. Signs that it’s time for a change include extensive fading, numerous broken elements, excessive brittleness that causes constant shedding, or loss of structural integrity in the overall design.
Rather than discarding entire arrangements, consider dismantling them carefully and saving elements that remain in good condition for future projects. Potpourri, craft projects, or smaller accent arrangements can give new life to materials from larger displays that have run their course.
- Rotate arrangements periodically to ensure even light exposure
- Address pest issues immediately if insects appear
- Monitor for any signs of mold, especially in humid conditions
- Keep pets away from arrangements, as some dried flowers can be toxic
Frequently Asked Questions
How long do dried flower arrangements typically last?
Well-made dried flower arrangements can maintain their beauty for 6 months to 2 years, depending on the flowers used, drying method, and care provided. Arrangements kept out of direct sunlight and in stable environmental conditions tend to last longest. Some particularly sturdy flowers like statice and globe amaranth may retain their appearance even longer.
Can I dry flowers from grocery store bouquets?
Yes, many flowers from grocery store arrangements can be dried successfully, though results vary by flower type and freshness when you begin the drying process. Roses, baby’s breath, and statice from commercial bouquets often dry well. However, flowers treated with preservatives or those that have been out of water for extended periods may not produce optimal results.
What’s the best way to prevent mold during the drying process?
Prevent mold by ensuring proper air circulation, avoiding overcrowding of drying materials, and maintaining low humidity in your drying area. Remove all excess foliage before drying, as leaves retain more moisture than flower heads. If you notice any signs of mold, remove affected materials immediately to prevent spread to other flowers.
Should I use hairspray or other sprays to preserve dried flowers?
While some crafters use hairspray or commercial floral preservatives, these products can attract dust and may cause flowers to become sticky over time. Professional floral sealers designed specifically for dried flowers provide better results if you choose to use preservatives. However, properly dried flowers often maintain their integrity well without additional treatments.
Can dried flowers be displayed in humid environments like bathrooms?
Bathrooms and other high-humidity areas are not ideal for dried flower displays, as moisture can cause flowers to become limp, develop mold, or deteriorate more quickly. If you want floral displays in these areas, consider artificial alternatives or choose fresh flowers that thrive in humid conditions and replace them regularly.
How do I fix dried flower stems that have become too short?
Extend short stems by attaching them to wooden skewers or floral wire using clear floral tape. Insert the support material into the hollow stem if possible, or tape it securely to the outside of solid stems. This technique allows you to achieve desired heights and positions in your arrangements while making use of flowers with naturally short or broken stems.
What flowers should beginners avoid when starting dried flower arranging?
Beginners should initially avoid very delicate flowers like impatiens, begonias, or lettuce-leaf flowers that don’t hold their structure well when dried. Also avoid flowers with high water content like lilies or orchids, as these require more advanced techniques and don’t always produce reliable results. Start with sturdy varieties like statice, lavender, and strawflowers to build confidence and skills.
Frequently Asked Questions
How long do dried flower arrangements actually last?
With proper care and storage away from direct sunlight and moisture, dried flower arrangements can maintain their beauty for months or even years. This makes them an excellent long-term investment compared to fresh flowers that typically only last one to two weeks.
Can I dry flowers from my own garden for arranging?
Yes, you can absolutely dry flowers from your garden, which makes dried flower arranging both rewarding and budget-friendly. The best candidates are flowers with sturdy petals like roses, lavender, and statice, which you can dry using simple methods like air drying or pressing.
What supplies do I need to get started with dried flower arranging techniques?
You’ll need dried flowers or plant materials, a vase or container, floral foam designed for dried arrangements, scissors, and optional embellishments like ribbons or greenery. Many crafters find they can start with minimal investment by drying their own garden flowers and using containers they already have at home.
Do dried flower arrangements require much maintenance?
Dried flower arrangements are very low-maintenance compared to fresh displays since they don’t need watering or daily care. Occasionally dusting your arrangement gently with a soft brush will keep it looking fresh and beautiful for an extended period.
