A baby quilt is the perfect first quilting project. It is small enough to finish in a weekend, requires minimal fabric, and is incredibly forgiving of beginner imperfections. Plus, a handmade baby quilt is one of the most treasured gifts you can give to new parents. Long after store-bought blankets have been donated or discarded, the handmade quilt remains a keepsake.
This tutorial walks you through every step of making a simple patchwork baby quilt, from choosing fabric to sewing the final binding stitch. No prior quilting experience is needed.
Our reviews are based on aggregated verified buyer feedback, manufacturer specifications, and published expert opinion. Products are not independently tested by our team.
Why a Baby Quilt Is the Perfect First Project
Baby quilts are ideal for beginners because they are small (typically 36 by 42 inches), which means fewer blocks to sew, less fabric to manage through your machine, and a finish line you can reach quickly. The manageable size lets you practice every quilting skill, from cutting to binding, without committing to a project that takes months.
Baby quilts are also practical, which means your first quilt will actually be used and loved rather than sitting in a closet. Parents wash baby quilts constantly, which gives the quilt that beautiful crinkled, soft texture that quilters love. And honestly, a few imperfect seams are completely invisible once the quilt is crumpled up in a crib or draped over a car seat.
Supplies and Fabric You Need
Here is everything you need for a simple 36 by 42 inch patchwork baby quilt made from 6-inch finished squares.
Fabric
- Quilt top: 6 to 8 fat quarters or quarter-yard cuts of coordinating fabric (100% quilting cotton)
- Backing: 1.5 yards of fabric (can be a single print or pieced from leftover top fabric)
- Binding: 1/3 yard of fabric
- Batting: One crib-size package (approximately 45 by 60 inches)
Tools
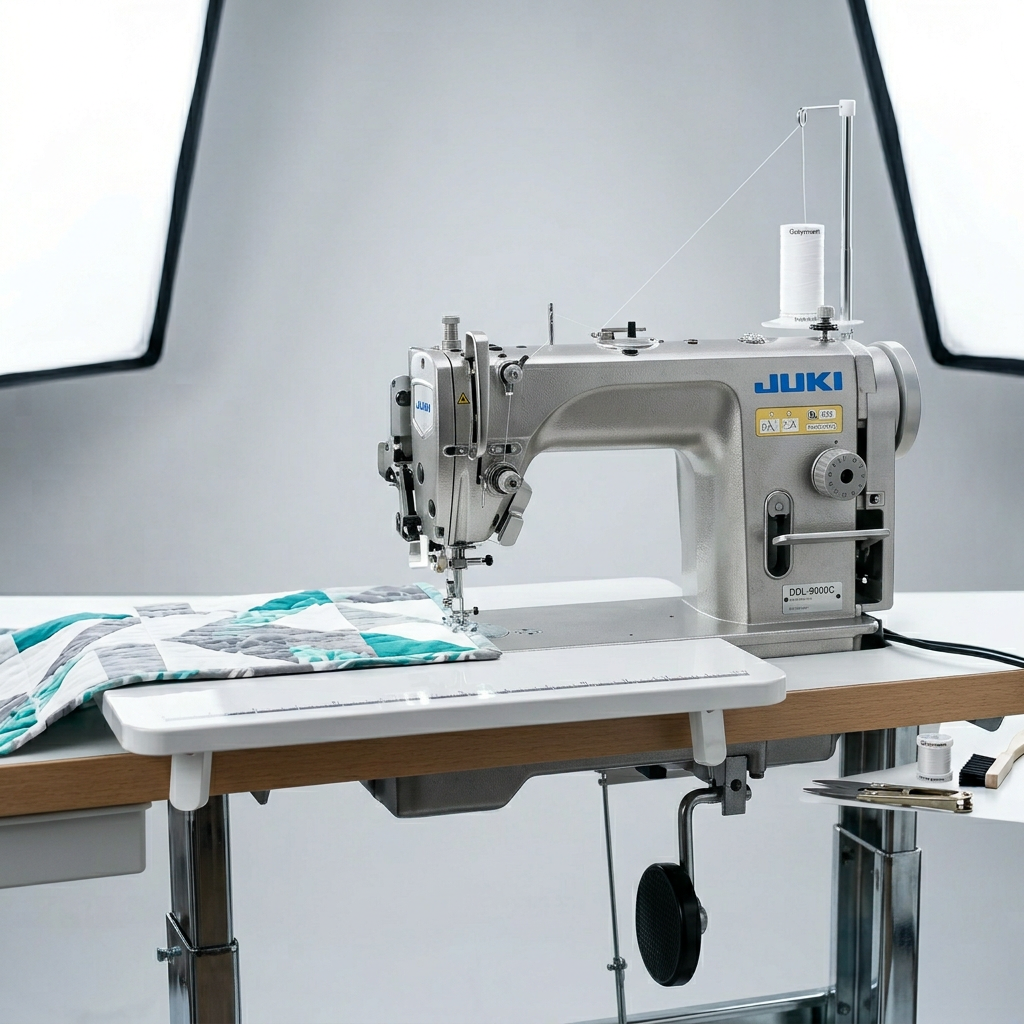
- Sewing machine with quarter-inch foot
- Rotary cutter, ruler, and cutting mat
- Iron and pressing surface
- Quilting pins or clips
- Thread in a neutral color
- Safety pins or basting spray
- Walking foot for quilting
- Hand sewing needle for binding (or machine bind)
If you need help choosing tools, our essential quilting tools guide covers every item in detail.
Choosing Baby-Safe Fabrics
Baby quilts have specific considerations beyond regular quilting.
Use 100 percent cotton. Cotton is breathable, washable, and gentle on baby skin. Avoid polyester blends, which can trap heat, and flannel, which is harder to piece accurately as a beginner (though flannel makes a lovely backing).
Pre-wash all fabrics. For baby quilts, pre-washing is strongly recommended. It removes chemical sizing and dyes that could irritate sensitive skin, and it causes shrinkage to happen before your quilt is assembled. Use a gentle, fragrance-free detergent.
Choose bright, high-contrast colors. Babies develop vision gradually and respond best to high-contrast patterns and bright colors. Black and white with pops of primary colors, or bold prints with strong contrast, are both excellent choices. Soft pastels are traditional but harder for babies to actually see. For more on fabric selection, see our quilting fabric guide.
Avoid buttons, beads, and loose embellishments. Anything that can be pulled off and swallowed is a choking hazard. Stick to printed fabric for visual interest rather than attached decorations.
Cutting Your Fabric Pieces
This quilt uses 42 squares, each cut at 6.5 inches (which finishes at 6 inches after sewing with quarter-inch seams). They are arranged in 6 rows of 7 squares.
Step-by-Step Cutting
Press all your fabrics smooth. Square up one edge of each fabric piece. Cut 6.5-inch strips, then cross-cut those strips into 6.5-inch squares. From each fat quarter, you can typically cut six to eight 6.5-inch squares. Cut squares from all your fabrics until you have at least 42.
Cut a few extra squares in case of mistakes. Label or stack your squares by fabric so you can plan the layout easily. For cutting technique details, see our rotary cutter guide.
- 1500 stitches per minute
- Auto thread trimmer
- Knee-lift lever included
Assembling the Quilt Top
Planning the Layout
Lay your 42 squares out on a flat surface in 6 rows of 7 squares. Distribute the colors and prints so no two identical squares are next to each other. Step back and look at the overall arrangement. Move squares around until you like the balance of colors across the quilt. Take a photo of the final layout with your phone so you can reference it while sewing.
Sewing Squares Into Rows
Stack the squares for each row in order. Place the first two squares of row one right sides together and sew with a quarter-inch seam. Without cutting the thread, feed the first two squares of row two. Continue chain piecing all six rows. Clip the connecting threads, then add the third square to each pair, and so on until all seven squares in each row are joined.
Press the seams of odd-numbered rows to the right and even-numbered rows to the left. This allows the seams to nest together when you join the rows.
Joining Rows Together
Place row one and row two right sides together, aligning the seam intersections. The seams should nest together because they are pressed in opposite directions. Pin at each seam intersection for accuracy. Sew with a quarter-inch seam. Add each subsequent row, pressing after each addition. When complete, give the entire quilt top a final press.
Adding Batting and Backing
Cut your backing fabric and batting four to five inches larger than the quilt top on all sides. For a 36 by 42 inch top, cut the backing and batting approximately 44 by 50 inches.
Making the Quilt Sandwich
Lay the backing fabric face down on a large, flat surface. Smooth it out and tape or clip the edges to the surface to hold it taut without stretching. Center the batting on top of the backing. Center the quilt top face up on the batting. Smooth each layer from the center outward, removing any wrinkles or bubbles.
Basting
Place safety pins through all three layers every four to five inches across the entire surface, starting from the center and working outward. Alternatively, use basting spray between the layers for a pin-free option. The goal is to hold the layers firmly together so nothing shifts during quilting. For batting selection guidance, see our batting comparison guide.
Quilting the Layers Together
This is the step where your three separate layers become a single, cohesive quilt. For a baby quilt, simple straight-line quilting produces beautiful results and is the easiest method for beginners. You do not need fancy free-motion skills to create a quilt that looks polished and professional.
Stitch in the Ditch
Attach your walking foot and sew directly in the seam lines (the ditch) of your horizontal and vertical seams. This anchors all three layers without adding visible stitching to the quilt surface. Start with the center seams and work outward. Remove safety pins as you approach them.
Straight-Line Quilting
For more texture, quilt straight lines across the entire surface. You can quilt horizontally, vertically, diagonally, or in a crosshatch pattern. Space the lines one to two inches apart for a nice amount of quilting texture. Use a quilting guide bar attached to your walking foot to maintain even spacing without marking every line.
Binding Your Baby Quilt
Binding is the final step that finishes the raw edges and frames your quilt beautifully. Trim the excess batting and backing even with the quilt top edges using your rotary cutter and ruler. Make sure all four edges are straight and the corners are square.
Cut binding strips 2.5 inches wide from your binding fabric. You will need approximately 170 inches of binding for a 36 by 42 inch quilt, which means cutting five strips across the width of the fabric. Join the strips end to end using diagonal seams, then press the entire strip in half lengthwise with wrong sides together.
Sew the binding to the quilt front with a quarter-inch seam, starting along one side rather than at a corner. Stop a quarter inch from each corner to create mitered turns. After sewing around the entire perimeter, fold the binding to the back and stitch it down by hand with a blind stitch or by machine. For detailed binding instructions including mitered corners and joining ends, read our complete quilt binding tutorial.
Personalizing Your Baby Quilt
A handmade baby quilt is already special, but small personal touches make it truly one of a kind.
Add a label. Sew a fabric label to the back of the quilt with the baby’s name, birth date, and your name as the maker. You can write on a piece of muslin with a permanent fabric pen or print a label using inkjet-printable fabric sheets. This turns your quilt into a documented keepsake that tells its story for generations.
Choose meaningful fabric. Use fabric from a parent’s shirt, a grandparent’s pillowcase, or clothing from the baby’s older siblings. Even one square of meaningful fabric mixed into the patchwork adds sentimental value that store-bought fabric cannot match.
Embroider a detail. A simple hand-embroidered initial, heart, or star on one block adds a handcrafted touch. Even a single embroidered element elevates the quilt from a practical item to a treasured gift.
Baby Quilt Size Guide
| Use | Recommended Size | Notes |
|---|---|---|
| Crib quilt | 36 x 52 inches | Standard crib mattress is 28 x 52 |
| Play mat | 36 x 42 inches | Great for tummy time and floor play |
| Stroller blanket | 30 x 36 inches | Compact, easy to carry |
| Receiving blanket | 36 x 36 inches | Square, good for swaddling |
| Toddler quilt | 42 x 56 inches | Grows with the child to toddler bed |
For a gift, ask the parents what size they prefer or default to the 36 by 42 inch play mat size, which is versatile enough for floor play, car seats, strollers, and cribs. According to the Safe to Sleep guidelines from the NIH, loose blankets should not be used in cribs for infants under 12 months due to suffocation risk. Many parents use baby quilts for supervised play rather than in the crib during sleep.
Frequently Asked Questions
How long does it take to make a baby quilt?
A simple patchwork baby quilt takes about 8 to 12 hours total, including cutting, piecing, quilting, and binding. Spread over a weekend with focused sewing sessions, most beginners can finish one in two to three days. The cutting and piecing take about 3 to 4 hours, quilting takes 2 to 3 hours, and binding takes 2 to 4 hours depending on whether you hand-stitch or machine-stitch.
What is the best batting for a baby quilt?
Cotton batting is the best choice for baby quilts. It is breathable, which helps regulate temperature, and it creates a flat, drapey quilt that is comfortable to lie on. Cotton batting also softens beautifully with washing. Warm and Natural cotton batting is a widely recommended choice. Avoid polyester batting for baby quilts because it can trap heat.
Can I machine wash a handmade baby quilt?
Yes, and you should plan for frequent washing. Use 100 percent cotton fabric and thread so everything shrinks evenly. Wash on a gentle cycle with cold or warm water and mild detergent. Tumble dry on low heat. The first wash creates that lovely crinkled texture as the cotton batting shrinks slightly. The quilt will continue to soften with each wash.
What if my seams do not match perfectly?
In a baby quilt, imperfect seams are genuinely invisible once the quilt is washed and in use. Do your best to match seams, but do not stress over perfection. A slightly wonky seam adds handmade character. The most important thing is that the quilt is loved and used. If you want to improve your precision for future projects, practice your quarter-inch seam on scraps between projects.
Frequently Asked Questions
How long does it take to make a baby quilt?
A baby quilt is small enough to finish in a weekend, making it an ideal first project for beginners. The manageable size of a typical 36 by 42 inch quilt means you can practice all quilting skills without committing to a months-long project.
Do I need quilting experience to make a baby quilt?
No prior quilting experience is needed to make a baby quilt. The smaller size is forgiving of beginner imperfections, and any uneven seams become invisible once the quilt is crumpled in a crib or draped over a car seat.
What fabric should I buy for my first baby quilt project?
You’ll need 6 to 8 fat quarters or quarter-yard cuts of coordinating 100% quilting cotton for the quilt top, plus 1.5 yards of fabric for the backing. The backing can be a single print or pieced together from leftover fabric from your top.
Why is a handmade baby quilt a better gift than store-bought blankets?
A handmade baby quilt becomes a treasured keepsake that parents will keep long after store-bought blankets are donated or discarded. The quilt develops a beautiful crinkled, soft texture through frequent washing and becomes a meaningful heirloom rather than just another baby item.